
Help Centre / Getting Started
Connecting your event software
Connecting your event software or point-of-sale system lets Event Captain see which events came from your outreach, including ones that never happen over email. Setup takes a few minutes and walks you through each step in your own system.
Where to start
On your dashboard, open Get Started and choose the step for connecting your event software. It asks Where do your events live? and shows a tile for each system. You can also start from your system's card on the Integrations page, which is in the account menu (your account chip at the top right).
Supported systems
You can connect Tripleseat, Toast, Perfect Venue, Square, Stripe, Roller, FareHarbor, SpotHopper, Dubsado and QuickBooks, each with its own steps. You can also send events through Zapier or a website form, or choose Other.
How to connect
- Open the event software step in Get Started and pick your system.
- Follow the numbered steps. They use the same menu names you'll see in your own system, and steps that are often missed are highlighted in amber.
- Import your past customers, or click Skip for now. Either way, you're taken back to your dashboard with a confirmation message.
Toast
Toast's API access requires an RMS Essentials or higher subscription. If you're not sure of your plan, check with your Toast account rep.
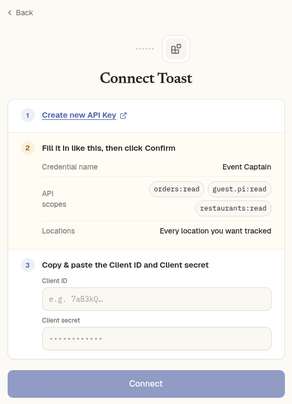
- In Toast Web, go to Integrations, then Toast API access, then Manage credentials, and create a new Standard API Access credential set.
- Name it Event Captain, give it the scopes orders:read, guest.pi:read and restaurants:read, and choose every location you want tracked. guest.pi:read is required: without it, Toast doesn't share the guest's email, so no order can be linked to your outreach.
- Save, then copy the Client ID and Client secret into Event Captain and click Connect. We check them with Toast right away and show your locations to pick from. Your secret is never shown again.
Tripleseat
- In Event Captain, open Integrations, then Tripleseat, and copy Your webhook URL.
- In Tripleseat, go to Settings, then API/Webhooks, then Webhooks, and add a webhook with that URL. (If there's already one with that URL, open it instead.)
- Make sure the webhook is enabled, every trigger is checked, and Include Event Payment and Line Item Information for Event Actions is turned on. Save.
- If you added a new webhook, Tripleseat shows you a signing key. Copy it, go back to Integrations, then Tripleseat in Event Captain, open Replace signing key, paste it and click Replace.
- Send yourself a test lead through your Tripleseat form.
If Tripleseat shows as connected but no leads or events are coming through, the webhook is usually missing, turned off or has no triggers checked. Go through steps 2 and 3 again.
Perfect Venue
Perfect Venue connects by adding an Event Captain email address to your Perfect Venue team. The Perfect Venue card on Integrations walks you through it:
- Click Open Team.
- In Perfect Venue, add the email account shown on the card as an Editor.
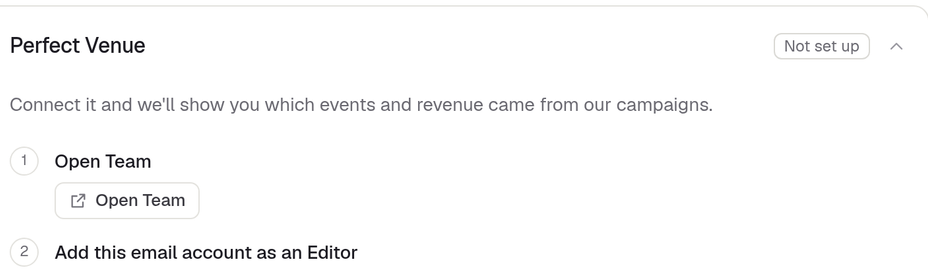
The card then shows how setup is going, so you don't need to ask us whether it worked:
- Not set up: we haven't seen the team invite yet.
- Invite received: we've received your team invite (with the date), but no event requests have come through yet. Inquiries aren't tracked until they do.
- Connected: event requests are reaching Event Captain, with the date.
QuickBooks
If you invoice your events in QuickBooks Online, connecting it gives Event Captain read-only access to your books. Each invoice becomes an event, events are matched to your leads so you can see which came from your outreach, revenue shows on your dashboard, and Google review requests can go out after the event date.
- Click the QuickBooks tile in Get Started or on the Integrations page. You go straight to Intuit's own approval screen.
- Approve read-only access. Your QuickBooks company is matched to your venue automatically, so there's nothing to pick.
- When asked, choose whether to import your past customers so we can reengage them to book again. A progress screen shows the import, and you can cancel it there, which undoes it.
Once connected, the QuickBooks card on Integrations shows Connected and your QuickBooks company name. To disconnect, click Remove on the card, which revokes our access.
- Imported past customers are reengaged around the anniversary of their event, and appear in your newsletter subscribers. Customers you entered by hand with no invoices come in as newsletter subscribers only. People who are already leads are skipped.
- Revenue is the invoice total after discounts. A deposit invoice and a final invoice for the same event count as one event.
- Review requests go to the email on the invoice, including for unpaid invoices. Voiding or deleting an invoice cancels a pending request, and refunds and credit memos never send one.
- If you cancel on Intuit's screen or something goes wrong, you come back to the QuickBooks setup with an option to try again. If your QuickBooks company is already connected to another Event Captain account, the card shows that it needs attention; contact us.
FareHarbor
FareHarbor sends your bookings to Event Captain through a webhook. The FareHarbor card shows Your webhook URL with a Copy button. It's always the same URL, and there's no separate Connect step.
- In Event Captain, click Copy next to Your webhook URL.
- In FareHarbor, open Settings, then Users & Permissions, and select your user.
- Open the Webhooks tab and click Add webhook.
- Paste your webhook URL, set the schema to Booking (All Fields), turn on New, Updated and Cancelled bookings, and save.
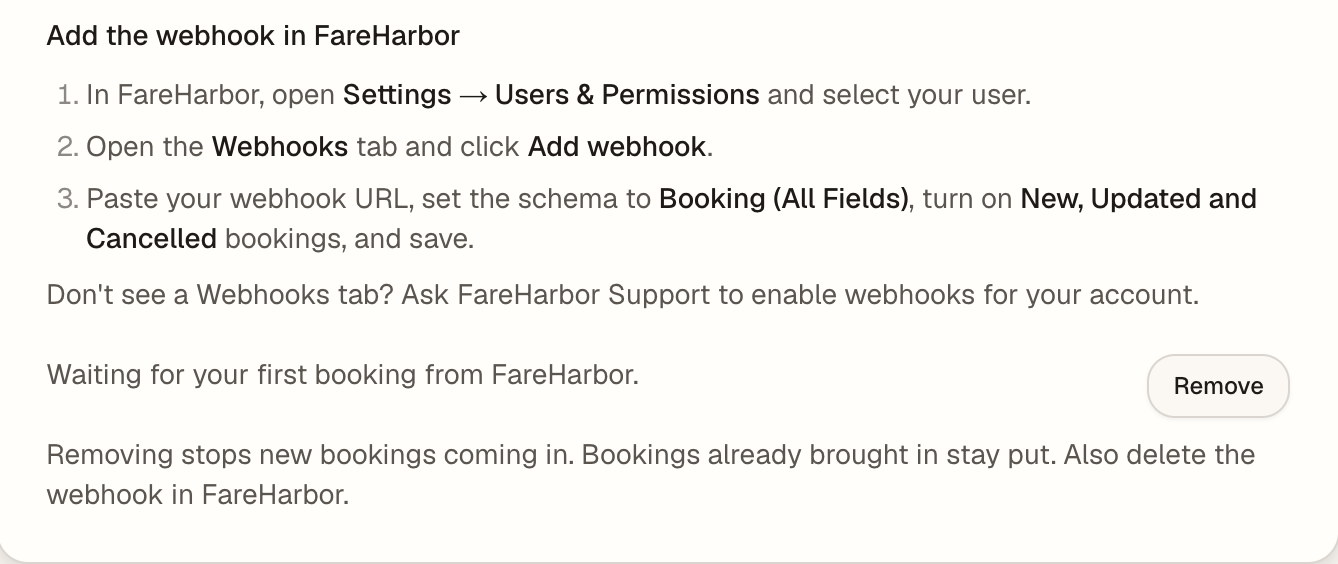
If you don't see a Webhooks tab, ask FareHarbor Support to turn on webhooks for your account.
Until your first booking comes through, the card shows Waiting for first booking and "Waiting for your first booking from FareHarbor." That's expected.
To disconnect, click Remove on the card. New bookings stop coming in, and bookings already brought in stay. Also delete the webhook in FareHarbor.
Square
Pick Square under Where do your events live? and follow the numbered steps on screen. You can connect more than one Square account from the Integrations page.
Stripe
Pick Stripe under Where do your events live? and follow the numbered steps on screen. If you don't have a Stripe account yet, you can create one when you connect. A connected Stripe account is also what lets guests pay by card from their proposal. See Card payments.
Roller
Pick Roller under Where do your events live? and follow the numbered steps on screen.
SpotHopper
SpotHopper works through your connected email. Once the inbox that receives your SpotHopper party requests is connected, we pick up those requests from it. There's no separate SpotHopper login to connect.
Dubsado
Dubsado connects through Zapier, with our team's help. If you choose Dubsado, we'll send you step-by-step instructions and share a Google Sheet with you. Your Zaps add a row to that Sheet for each new lead, new job, status change, payment and signed contract, and we pick up new rows every 15 minutes.
The setup happens in your own Dubsado and Zapier accounts. In outline (Dubsado and Zapier menu names come from those apps, not Event Captain):
- In Dubsado, go to Settings, then Integrations, then Zapier, and create an API key named "Event Captain".
- In Zapier, connect Dubsado with that key, and connect Google Sheets.
- Turn on the five Zaps described in our instructions, one for each tab of the Sheet.
- Reply to let us know when they're on, and we'll switch the connection on.
- Each Dubsado event uses one Zapier task, so make sure your Zapier plan has enough tasks each month.
- Once connected, your dashboard shows the Dubsado events that came from our outreach. A project moved to Lost Lead or Canceled in Dubsado closes out on your dashboard too.
Zapier and website forms
Zapier needs a paid Zapier plan. For Zapier or a website form, follow the steps, send a test, then click Done, test sent. Keep the page open until Event Captain sees the test come through.
If your system isn't listed
Choose Other, the last tile in the list of systems. On the Request an integration screen, tell us which system you use (for example Tock or HoneyBook) and click Send request. You'll see "Request sent. We'll reach out about getting it connected."
A request doesn't connect anything, so the step stays open in Get Started until your event software is connected. Requests aren't listed in your dashboard, so if you don't hear back, reply to any email from your Event Captain team.
After you connect
Until your first event comes through, the confirmation message may say we're watching for it, and the Integrations page may show that it's still waiting for the first one. That's expected.
Connected event software is also what Google review requests use. See Google Reviews. For your inbox, see Connecting your email.
Can't find what you need? Reply to any email from your Event Captain team and we'll sort it out.